Admin Dashboard
The centralized hub for managing your WooCommerce store templates, settings, and widgets — all from a modern React-based interface inside WordPress.
Overview
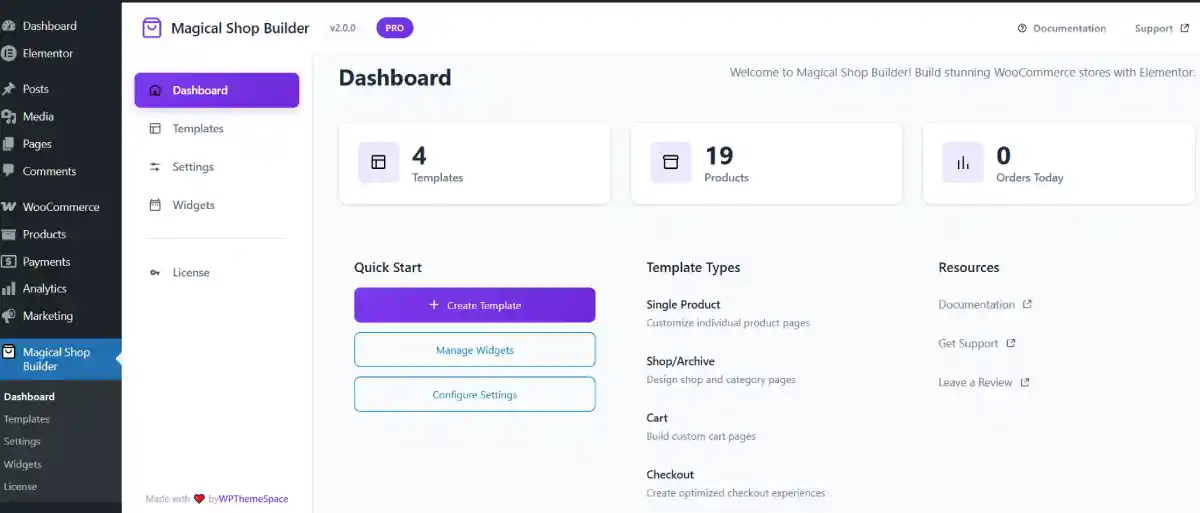
The Magical Shop Builder dashboard provides a centralized hub for managing your WooCommerce store templates, settings, and widgets. It's accessed via the Magical Shop Builder menu in the WordPress admin sidebar.
The dashboard is a modern React-based single-page application that renders inside the WordPress admin area. It is registered at menu position 58, placing it conveniently below the WooCommerce menu item.
| Property | Value |
|---|---|
| Page Slug | magical-shop-builder |
| Menu Position | 58 |
| Required Capability | manage_options |
| Interface Type | React SPA (Single Page Application) |
Only users with the manage_options capability (typically Administrators) can access the Magical Shop Builder dashboard. Other user roles will not see the menu item.
Menu Structure
The Magical Shop Builder admin menu contains several sub-pages, all handled as hash routes within the React SPA:
| Menu Item | Route | Description |
|---|---|---|
| Dashboard | #/ (main page) |
Store statistics, quick links, and plugin overview |
| Templates | #/templates |
Create and manage page templates for your store |
| Settings | #/settings |
Configure plugin behavior and preferences |
| Widgets | #/widgets |
Enable or disable individual widgets |
| Upgrade to Pro | #/pro |
Pro upgrade information (only shown when Pro is not active) |
| License | External link to Pro admin page | License management (only shown when Pro is active, replaces Upgrade to Pro) |
The Upgrade to Pro menu item is automatically hidden once the Pro version is activated. It is replaced by a License link that opens the Pro admin page for license management.
Dashboard Statistics
The main dashboard page displays three real-time stat cards at the top, giving you a quick overview of your store at a glance:
| Stat Card | Data Shown |
|---|---|
| Templates | Total count of published templates (clickable — links to the Templates page) |
| Products | Total number of published products in your WooCommerce store |
| Orders Today | Number of orders placed today (completed and processing) |
Statistics are fetched via the WordPress REST API each time you visit the dashboard. If you notice stale data, simply refresh the page to pull the latest numbers.
Quick Start
Below the stat cards, the dashboard displays a Quick Start section with three action buttons to help you get started quickly:
| Button | Action |
|---|---|
| + Create Template | Navigates to the Templates page to create a new template |
| Manage Widgets | Navigates to the Widgets page to enable/disable widgets |
| Configure Settings | Navigates to the Settings page to configure plugin options |
Template Types
Next to Quick Start, the Template Types card lists the available template types you can create, each with a short description:
| Template Type | Description |
|---|---|
| Single Product | Customize individual product pages |
| Shop/Archive | Design shop and category pages |
| Cart | Build custom cart pages |
| Checkout | Create optimized checkout experiences |
| My Account | Customize customer account pages |
A View All Templates link at the bottom takes you to the full Templates management page.
Additional template types Empty Cart and Thank You Page are also available when creating templates from the Templates page.
Resources
The Resources card provides quick links to external support and community resources:
- Documentation — Opens the official Magical Shop Builder documentation site
- Get Support — Links to the WPThemeSpace support page for help and assistance
- Leave a Review — Opens the WordPress.org review page to leave feedback
Upgrade to Pro Card
When the Pro version is not active, the dashboard also displays an Upgrade to Pro card highlighting key Pro features:
- Advanced template conditions
- Sticky add to cart
- Wishlist & Compare
- Quick View popup
- Priority support
An Upgrade Now button links to the Pro purchase page. This card is automatically hidden when Pro is active.
Templates Management
The Templates page (#/templates) provides a table/grid view of all your created templates. This is where you manage the lifecycle of each template.
Each template card or row displays the following information:
| Field | Description |
|---|---|
| Name | The template's title |
| Type | Template type (Single Product, Shop/Archive, Cart, Checkout, My Account, Empty Cart, or Thank You) |
| Status | Published or Draft |
| Edit | Opens the template in Elementor editor |
| Conditions | Link to configure display conditions |
| Duplicate | Creates a copy of the template |
| Delete | Permanently removes the template |
You can filter the template list by type using the filter dropdown at the top of the page. This is especially useful when you have many templates across different page types.
For detailed documentation on creating templates, setting conditions, and using pre-built layouts, see the Template Builder page.
Widget Management
The Widgets page (#/widgets) gives you granular control over which Elementor widgets are loaded by the plugin. Each widget can be individually toggled on or off using simple toggle switches.
Why Disable Widgets?
Disabling widgets you don't use improves your site's performance by preventing unnecessary CSS and JavaScript assets from being loaded on your pages. If you only use a handful of the 63 available widgets, disabling the rest can noticeably reduce page load times.
How It Works
- Widgets are organized by category (e.g., Product Display, Single Product, Cart, Checkout, etc.)
- Each widget has a toggle switch — on means the widget is registered and available in Elementor; off means it is completely skipped
- A summary counter shows the number of enabled widgets vs. the total available
- Changes are saved via the Save Changes button — newly added widgets are enabled by default for free users
If you're only using Single Product and Shop Archive templates, disable all Cart, Checkout, My Account, and Thank You page widgets to reduce asset load. See the Performance page for more optimization strategies.
Technical Details
For developers and advanced users: the admin dashboard React app receives configuration data via a localized JavaScript object called mpdAdmin. This object is injected into the page using wp_localize_script() and contains the following properties:
| Property | Type | Description |
|---|---|---|
apiUrl |
string | The WordPress REST API base URL |
nonce |
string | WordPress REST nonce for authenticated requests |
adminUrl |
string | WordPress admin URL (e.g., /wp-admin/) |
pluginUrl |
string | URL to the plugin's root directory |
version |
string | Current plugin version |
proUrl |
string | URL to purchase the Pro version |
proAdminUrl |
string | Admin URL for Pro settings (if Pro is active) |
supportUrl |
string | Link to the support page |
docsUrl |
string | Link to the documentation site |
strings |
object | Localized UI strings for labels and buttons (e.g., dashboard, templates, settings, widgets, proFeatures, saveChanges, saving, saved, error) |
The strings property contains all translatable UI labels used by the React interface, enabling full internationalization (i18n) support through WordPress translation functions.
Accessing in JavaScript
You can access the localized data in your browser console or in custom scripts:
// Check if Pro is active
if (window.mpdAdmin.isPro) {
    console.log('Pro version is active');
}

// Get the REST API URL
const apiUrl = window.mpdAdmin.apiUrl;

// Get the nonce for authenticated requests
const nonce = window.mpdAdmin.nonce;The mpdAdmin object is only available on the Magical Shop Builder admin page. It is not loaded on other WordPress admin pages to keep things lightweight.