Template Builder
Create custom WooCommerce page templates with Elementor's visual editor. No coding required.
Overview
The Template Builder is the core feature of Magical Shop Builder. It uses a hybrid approach that works with both Elementor Free and Elementor Pro:
- With Elementor Free: Uses a custom post type (
mpd_template) to store templates. The plugin handles rendering via its own system. - With Elementor Pro: Can also integrate with Theme Builder locations for seamless workflow.
The system is built on 4 core classes:
| Class | Role | Size |
|---|---|---|
| Builder | Orchestrator — manages the template building workflow | 552 lines |
| Manager | Handles template CRUD operations, uses mpd_template custom post type |
837 lines |
| Conditions | Evaluates which template to show based on rules | 764 lines |
| Renderer | Renders templates at WooCommerce hook priority 998 | 458 lines |
Template Types
Magical Shop Builder supports 7 template types, covering every major WooCommerce page:
Single Product
Customize how individual product pages look
single-product
Product Archive
Design shop and category listing pages
archive-product
Cart
Redesign the shopping cart page
cart
Checkout
Create a custom checkout experience
checkout
My Account
Brand the customer account area
my-account
Empty Cart
Design what users see when cart is empty
empty-cart
Thank You
Customize the order confirmation page
thankyou
Creating Templates
Follow these steps to create a new template:
Navigate to Templates
Go to Magical Shop Builder > Templates in the WordPress admin sidebar.
Add New Template
Click the "Add New Template" button at the top of the templates page.
Choose Template Type
Select a template type from the dropdown (e.g., Single Product, Cart, Checkout).
Name Your Template
Enter a descriptive name for your template, such as "Custom Product Page" or "Holiday Checkout".
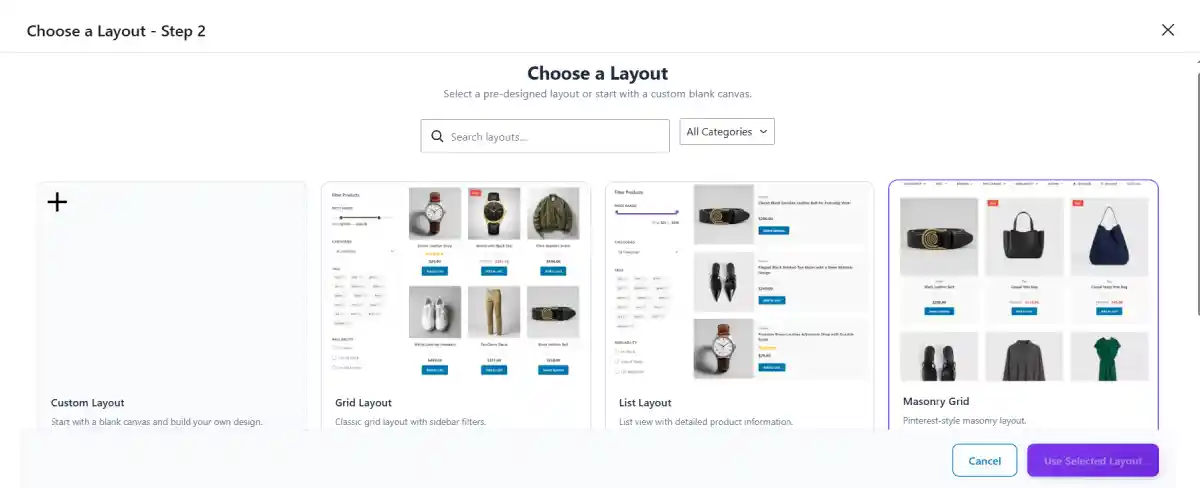
Select a Pre-Built Layout (Optional)
Optionally select a pre-built layout to start with. This gives you a professionally designed starting point.
Create & Edit
Click "Create" — the template opens in the Elementor editor where you can start designing.
Add Widgets
Drag Magical Shop Builder widgets from the Elementor panel into your design. Widgets are organized by template type.
Save & Publish
Save and publish the template. Then set display conditions to control where it appears.
Template Conditions
Conditions are the most powerful feature of the Template Builder. They determine when a template is displayed. Each template can have include and exclude rules.
Available Condition Types
There are 9 condition types you can use to target specific pages or products:
| Condition | Value | Description |
|---|---|---|
all |
— | Apply to all items of this template type |
product_type |
simple, variable, grouped, external | Target specific product types |
product_category |
Category slug | Target products in specific categories |
product_tag |
Tag slug | Target products with specific tags |
specific_product |
Product ID | Target a single product |
product_in_stock |
yes / no | Target based on stock status |
product_on_sale |
yes / no | Target sale products |
user_role |
administrator, customer, etc. | Target based on user role |
user_logged_in |
yes / no | Target logged in or logged out users |
Include vs. Exclude Logic
Include conditions define where a template is shown. If a page matches any of the include conditions, the template is eligible to render on that page.
Exclude conditions override includes and have higher priority. Even if a page matches an include condition, it will be skipped if it also matches an exclude condition.
You can combine multiple conditions. For example, show a special template for "variable" products in the "clothing" category, but exclude products with the "sale" tag.
Template Priority
When multiple templates match the same conditions, priority determines which one wins. Lower number = higher priority.
Templates can be reordered in the admin dashboard by dragging them into the desired order. The template with the highest priority (lowest number) that matches the current page's conditions will be used for rendering.
Pre-Built Layouts
Magical Shop Builder comes with pre-built layout structures for each template type. These give you a professional head start so you don't have to design from scratch:
- Each template type has multiple pre-designed layouts to choose from
- Layouts can be imported with one click when creating a new template
- Layouts are stored locally and can also be fetched from a remote server
- Remote server:
https://mp.wpcolors.net/(usingmpd-layout-server/v1API) - Layouts are cached for 1 day to improve performance

Editing Tips
- Use the widget categories in the Elementor panel — they auto-expand based on template type
- Single Product templates show product title, price, gallery, etc. widgets
- Cart templates show cart table, totals, coupon form widgets
- Preview products in the editor using the built-in preview product selector
- Templates support Elementor's responsive design tools
Make sure to enable the corresponding template type in Settings before creating templates. For example, enable "Custom Single Product Template" in Settings before creating single product templates.